|
Propagation of Lophophora
Propagation is through seed, or cuttings which
can be accelerated by grafting.
In the wild, peyote will take fifteen to twenty-five years before reaching a point
of flowering maturity. If conditions are controlled to that of optimum, these
same plants can grow to a point of flowering maturity within two to three years
or less. And if one wishes to really speed up the process of growing mature plants
from seed, then grafting is the way to go. If one starts out by grafting one,
two, or three month old seedling, it is possible to get flowers that produce
viable seed about six months later.
How do I know? From
personal experience. In fact, I have personally been able to achieve
a flowering plant from seed by grafting within seven months of
planting the seed. The same plant put out its first fruit with
seed by its tenth month. For those that are a little nervous to
try their hand at grafting or just prefer a hard grown plant from
seed I also have good news. When proper conditions are offered
one can have a plant flowering within as little as one year and
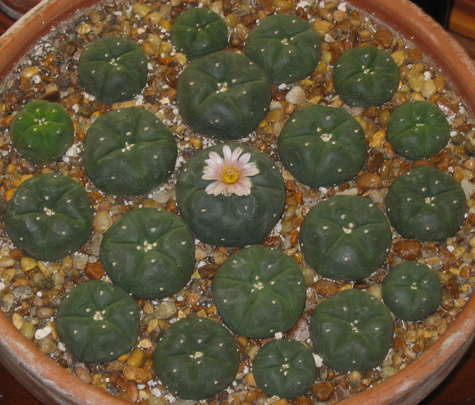
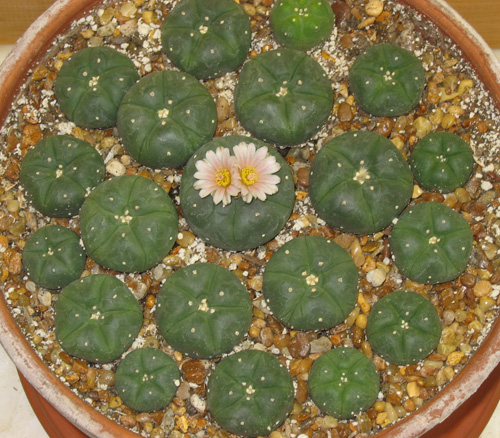
a half, just as in the picture you see here below. This batch of
Lophophora Williamsii was planted December 14th 2006, and put out
its first flower by June 11th 2008. If I can do this, I am sure
that anyone with the desire to grow such a beautiful plant can
too... and that means you!!

The most important things to understand are that seed fertility,
moisture, temperature, soil mix, and light all affect seed germination.
Soil conditions for the cultivation of peyote are not too critical.
The natural soil for peyote is of limestone having a basic pH from
7.9 to 8.3., so one should provide adequate calcium (limestone
chippings are best if available), and most importantly provide
good drainage. There are many combinations possible when making
peyote soil. Sand, peat, limestone, blood meal, bone meal, potting
soil, bat guano, rabbit shit, vermiculite, perlite, and polymers
are commonly used. Doesn’t make much difference so long as there
is no extreme condition created causing such things as nitrogen
burn, saline dehydration, or mud, so long as you provide for excellent drainage. Most of my friendly clients ask what my specific mix is in order to match it if they can so here it is, but you don't have to follow it exactly. Before I offer it you must know that this mix is for any and all cacti I grow once they pass the first stage of repotting after the seed tray. All my seedlings are germinated in "Premier” Pro Mix for seedlings. Now here you go:
My Own Special Cactus Mix : I use one part quarter chip gravel, one part quarter chip limestone screenings, one part mid ph pumice, one part perlite, and one and a half parts earth worm casings. For those that don't want to spend very much money a decent mix that should do well is taking any bag of commercial cactus soil and adding fifty percent perlite to improve drainage and prevent hardening of the sand added in such mixes.
All cacti (especially cuttings)
need a low nitrogen, high phosphorous fertilizer to stimulate
root development and proper tissue consistency. Although high nitrogen will dramatically
increase growth rate, the cacti could swell, split and or become
hollow. During the fall and winter such plants have a lower survival
rate because they’ll be unable to “harden off” against the cold.
Seeds should be as fresh
as possible,
although seeds that have been kept in a cool environment have been
known to keep for years. Seeds may lay dormant for years and still
remain viable if kept dry and away from light. However, fresh seeds
are more likely to be vital and should be planted as soon as proper
conditions are available. Seed fertility, moisture, temperature,
soil mix, and light all affect seed germination. Seeds should be
started in lidded trays, or in small pots covered by a sandwich
bag.
Lophophora Williamsii Seed Growing Instructions
1 – Fill seed trays or small pots with compost mix and flatten
mix down gently. (Any seedling mix purchased at your home and
garden centre will do. Premier” Pro Mix found at Rona is one
of the best.)
2 – Soak the compost using boiling water to kill parasites. Once soaked, allow
to drain and cool for about an hour. Then press down on seedling mix with the back of a spoon to make sure water does not pool... if so it still has to drain more unless you can press some out.
3 – Sprinkle seeds evenly over the compost mix, and then gently press seeds down
and level with top of mix using the back of a spoon.
4 – Cover with seed tray cover, or enclose pots in zip lock plastic bags.
5 – Place under grow lights or in a well lit window but not in direct sunlight
as this could scorch your seedlings. Temperature should reach above 80(26 degrees C) to 110(43 degrees C)
degrees F during the day, and must dip below 80 at night for best germination results.
6 – If pots are placed in zip lock bags water might not be needed for months.
If seed trays begin to dry out, spray to moisten the surface.
7 – Seeds should germinate within 2 to 14 days.
8 – When seedlings are about four to six months old begin acclimatizing by lifting tray covers or poking holes in zip lock bags for two to three days.
9 - Keep seedlings in indirect sunlight for about six months, and then slowly
let them have more light. Seedlings should have a lush green color if the light
levels are right. If the epidermis turns red it means they are getting too much
light. If so raise lights or shade window with appropriate material possibly
cheese cloth.
10 – Be in no hurry to repot your seedlings. Lophophora
enjoys the company of others, so wait until they are really fighting
for room. They will be ranging in sizes of between one and two centimeters in width, or if you prefer no bigger than half an inch.
Seedlings will germinate in two
to ten days, but can and have germinated in as little as twenty
four hours. Initially they’ll appear as little green balls wearing shiny black hats, but
a trained eye will soon notice the cotyledons and first set of
areoles.
Extra Growing Information for the
Real Enthusiast
Lights – I keep my lights on using timers. Nothing
elaborate is needed. Lights should be turned on for twelve to sixteen
hours a day.
Temperature – Most plants seem to like fluctuating
temperature, and Lophophora does as well. If the temperature is
either to hot or too cold seeds will not germinate. Lophophora seems
to bear temperatures between 5 and 55 degrees C. For germination
purposes I have found that a day time temperature of anything from
30 to 41 degrees C works very well, so long as the night time temperature
does decrease. Night time temperatures should drop lower than 25
degrees C. There seems to be a cross over between
day and night time temperature that actually cause the seeds to sprout, and
unless this cross over is met most of your seeds will not germinate.
Also, in the wild Lophophora exhibits a wide range
of aridity, with only between 64.0 and 394.0 millimeters of rain per year.
Adult Peyote plants can tolerate temperatures within a range of
45-130 degrees Fahrenheit. If soil is kept dry, it can survive temperatures
as low as 30o F. Frequent watering and a shade cloth will protect
it from temperatures exceeding 120 degrees F. Peyote is very sensitive
to frost or prolonged near freezing temperatures and is easily
injured or killed by frost. It should be brought inside in locations
where the temperatures drop below 40 degrees F.
Water - In the growing season,
I water my plants twice a week on a regular basis. Some might think
this excessive but my plants are robust and very healthy. I also
add a very light fertilizer with every
watering.
Your watering frequency will be dependant on two factors... the intensity of light provided and the temperature at plant level.
These two factors will govern evaporation to a certain extent. Plants should not be watered again until the median has been dry for two to three days. Once plants need a drink they become a little softer when you give them a little squeeze. A day or two after plants have had a good drink they get nice and hard to the touch.
Increasing The Alkaloid Concentrations
One of the main defences of cacti is to increase the production
of protective alkaloids in response to numerous external stresses.
The growing cactus plant can be "stressed" in a number
of ways to help increase the concentration of alkaloids prior to
harvest. It should be noted that, since cacti have a slow metabolism,
it may take an entire growing season of stress to significantly
affect alkaloid levels.
Here are some of the most common and widely tested methods:
Shade: There have been several reports that leaving live (or
cut Trichocereus) in the shade for several months prior to harvesting to increase
the percentage of alkaloids in the tissues of the plant. It is also common
in Mexico and South America to leave cut cacti in large covered stacks for
some time prior to being sold. There may be a good reason for that practice.
Excess Sun and Heat: Too much Sun or heat will most definitely
stress a live cactus. It must be realized however, that increasing the alkaloids
through stressing will greatly affect the plants growth rate, and might just
kill it. Cactus can and do get sunburned, which can be fatal.
Nutrient level variations: Different formulas of fertilizers
will affect the growth rate, and therefore the alkaloid mix and percentages.
Very high nitrogen levels in the soil would help to draw water out of the cactus,
and promote stress. Use caution as too much nitrogen will burn your plant.
Remember though, a fast growing cactus is also lower in alkaloids per volume.
Watering stress: Depriving the intended victim of water is
the most widespread method of trying to increase the alkaloid content. Many
people advise to buy your cactus at least one growing season in advance, and
then let them sit, without water, until they are ready to harvest.
Happy Growing Everyone...

email: dr_frank @ magicactus.com
Mailing
address:
Frank
Valente
MagiCactus.com
56 Dewhurst Blvd.
Toronto, Ontario
M4J 3J3
© 2008, Frank Valente |

